
 |
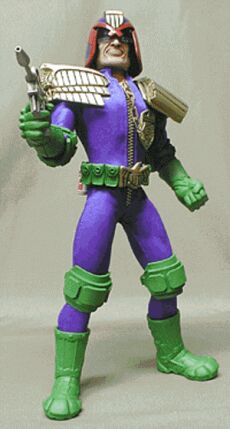
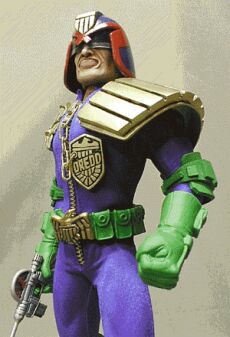
12" JOSEPH DREDD BY JOHN HAYSHere's one of my favorite characters from the British '2000 AD' comics. I've been wanting to do this figure for quite some time and finally had the resources and time to make him! I learned a great deal from this project (a lot of it the hard way) and ventured into new territory in which I was too scared to try or too poor to afford before. But, all in all, I consider it a stepping stone to greater things in my future customizing career. Dredd began life as a modified Max Steel due to the buff nature of the figure's physique... unfortunately, it turned out that the body was dwarfed by all the gear of the uniform. But, one can't usually foresee these types of problems until it's too late and I don't even think there's a more muscular figure on the market to date, which maintains any suitable articulation. So, one just has to live with what's available. I sculpted a new head for him and added articulated feet. He has no hands, just styrene posts mounted into the peg holes of the wrists, which provide a guide and support for the gloves. The head is Super Sculpy and painted with a technique I've never tried before on a 12-inch figure. It's an old scale modeler's trick called 'dry brushing' and 'washing'. Sure, I'm not new to this form of painting (I've done it a million times on small models), but applying it to large figures is a totally different animal! It turned out fairly well and for tips on the technique, I followed the instructions on Ransome Chula's Frontline site. By the way, Dredd's head is fully sculpted, painted and articulated! But, if you follow the comic, you'll know that his face is never revealed. So, to pay tribute to the character, I won't show it here, either... you'll just have to take my word that it's all there. :) |
|
The
bodysuit is made from lycra and sewn from a modified
version Brenda Anderson's 'Male Wetsuit' pattern at Miniature Mannequin Matrix (broken link). As you can see, the
collar doesn't stand up well or form a 'v' in the front
like it should. Part of the problem is due to the type of
zipper I used. I would have liked a zipper with a smaller
tooth and slider, but I just wasn't able to find one in
gold or brass so, I wound up using one intended for
jeans. The other factor is due to the design of the
collar, which is a seamless continuation of the bodysuit.
What I should have done is cut a separate piece of fabric
and sewn it to the suit. I probably would have corrected
this problem if the zipper wasn't such a pain to sew on
in the first place, but I digress. The helmet is made from a 1:1 mixture of regular Sculpy and Super Sculpy. I started with a lump of clay, sculpted the helmet and baked the result as a solid piece. Then I hollowed it out using a Dremel tool. I don't really recommend this method, but since I hadn't broken down and bought casting materials at that point, it was the only course of action available to me. After many fine-sanding sessions, it was painted with an airbrush and coated with Future floor wax. The visor is made from a piece of clear plastic backing (used to hold items in figure packaging) which was painted and superglued to the inside of the helmet. |
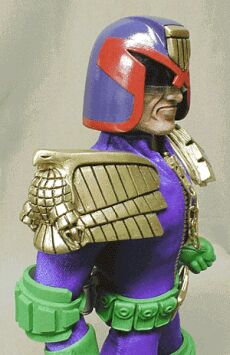 |
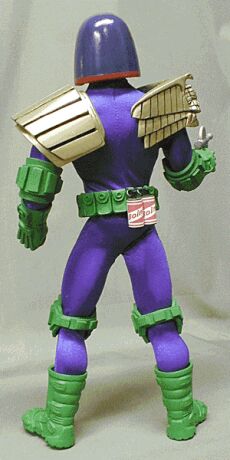
The
shoulder eagle, shoulder pad, badge and belt buckle are
sculpted from Super Sculpy and painted with '18 Karat
Gold' spray paint by Krylon. Then a black wash was
applied. Each shoulder piece is attached by drilling
small holes into the sculpt and sewing them to the
bodysuit to allow full movement of the arms. The badge is
glued to the bodysuit and linked to the slider on the
zipper with a piece of brass chain I found at Home Depot.
The belt buckle has snaps sewn onto the back of it (in
the same manner as the shoulder pieces) which attach to
the snaps on the belt. As the project progressed, I started to consider the possibilities of resin casting. Dredd's belt was a major part of this conclusion. I faced the problem of making multiple ammo pouches so, instead of sculpting each and every one, I finally bit the bullet and sprang for some casting supplies. I soon found out that casting is double edged sword! The upside is that it saves you from a lot of meticulous sculpting... the downside is that resin and silicone are two mediums that are totally unpredictable. To make a long story short, I used 10 out of the 20 ammo pouches I cast. |
 |
The gloves were another 'new' venture for me. I wanted to keep the look of a one-piece garment so, I decided to sculpt them. I know, there is no articulation in a sculpted glove, but since flexible casting is very hard to do and most of the wrist's movement is still hindered anyway, it was the best option I could think of. Once the gloves were sculpted and baked, the cuffs were hollowed out and a hole was drilled into the hand areas so, they could slide onto the posts mounted in the forearms. I don't think I'll use this technique with Super Sculpy again, because I had a few breakage problems, but I may try it with resin. |
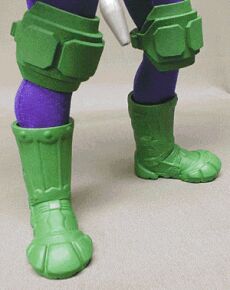 |
The boots are from a knock-off G.I. Joe 'Power Team' figure. They are made from the typical flexible vinyl, but then I applied some Super Sculpy enhancements and then painted them. I'm not sure how long the Sculpey pieces will stay attached, but since there was no cracking after I baked the boots, there's a chance they may hold up throughout the life of the figure. The elbow and knee pads are made from craftfoam and painted. I would have liked to see more beveled edges on them, but to do that I would have to cast them in a flexible material... and we all know how I feel about that! |
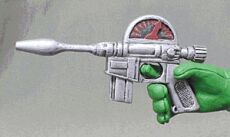
| The last and final piece to be done was the "Lawgiver". It's design is based on the classic version, with my own twist on it. The construction of it was basically a amalgamation of various weapons and junk I had in my parts box. The grip, trigger guard and ammo clip is from a knock-off M-16, while the barrel and top half of the gun is a Cotswold MP-40 (sawed off at the ammo chamber). I drilled out a section in the back and added the front part of the 'light/grip module' from a H&K MP5A3 and cut grooves in it with an x-acto saw. The muzzle is made from the top of a model glue dispenser tip with a Milliput backing, tapering down to the barrel. The 'level indicator' is made from Milliput. |
 |
In the spirit of the comic, I felt that any good Mega City cop should be well supplied with plenty of 'Boing' so, I printed off a few labels of my own design and wrapped them around a couple of Smoke Canisters by 21st Century Toys. These are attached to the belt with strips of craftfoam and jump-rings. |
| Stay tuned for
more 2000 AD characters and other Dredd related stuff! | |
![]() Judge Dredd and 2000 AD © Rebellion A/S 2008.
Judge Dredd and 2000 AD © Rebellion A/S 2008.
BARNEY is a fan site by
based on 2000 AD Online 2001-2008.