HOW TO BUILD A JUDGE DREDD COSTUME
BY KEVIN GOLDSMITH
JUDGE DREDD ARMOUR
 |
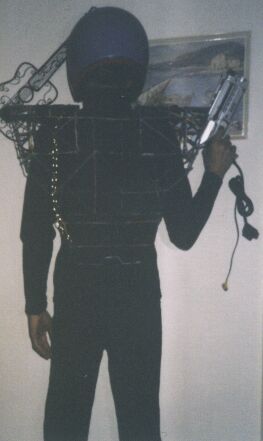 |
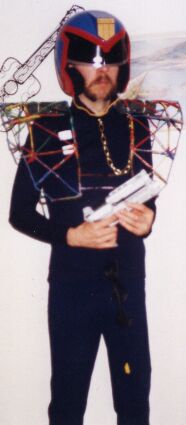
Having been successful in making a Judge Dredd (movie) helmet, and seen the photos that Ian Marchant had emailed to me of his full-scale costume, I decided to have a go at one myself. The more I thought about it, the more some parts took a lot of thought. I found that the best way of doing it was to build it the same way as my Action Man convert (York 97 winner: Best Scratch Built Figure).
A few months previous, I had built the upper armour out of pipecleaners to get the dimensions correct, so that when it came to build it properly, I only had to use this framework as a kind of template when cutting the sheet styrene. This would, in the end save me a bit of time and effort.
Then came obtaining some sheet plastic. Ian had used corrugated plastic that radio controlled aircraft enthusiasts use, but I decided to go with a material that I have worked with many times before and know well. We have two model shops in Bicester, one does not do sheet plastic, and the other only seems to stock up when there is a royal wedding! I had only two other choices, there used to be a place in Headington, just outside Oxford, but that has now gone-sheeesh! - And some of the Drone-related stuff that I receive through the post-well the less said about the better.
So off went a cheque for £57 to E.M.A. model suppliers. I simply had no other choice.
While I waited the normal week for this to arrive, I worked on the upper tunic. I searched through my Dad's cupboard and found a thin navy blue turtleneck sweater-perfect! I cut a slit down the front of the neck and then sewed this to form the 'U' shape, and then looked through my Mum's sewing box and found some gold-coloured cord which I proceeded to sew on to the collar to form the edging seen in the movie costume.
Then came the two collar
'studs'. I have no clear shots of these, but the main shape seems
to be the same as the badge, with what seems to be a raised star
design-though I could be wrong. I was going to glue these to the
costume, but in the end I decided to go for the cleaner approach
of sew-on pop fasteners. I sewed one half of the fasteners on to
each side of the collar, and then cut 2 pieces of 2mm thick sheet
this shape: ![]() and bevelled the edges. After which I cut 2 raised
star shapes by firstly cutting 2 star shapes and carefully
bevelling the edges, I then glued the stars to the larger pieces:
and bevelled the edges. After which I cut 2 raised
star shapes by firstly cutting 2 star shapes and carefully
bevelling the edges, I then glued the stars to the larger pieces:
![]() and then superglued the other halves of the pop fasteners to the
backs of these assemblies, so that the collar studs could simply
be popped on and off. I then cut some chain to the correct
length, in my case this was 7 links, and sewed one end to the
bottom of the 'U' shape.
and then superglued the other halves of the pop fasteners to the
backs of these assemblies, so that the collar studs could simply
be popped on and off. I then cut some chain to the correct
length, in my case this was 7 links, and sewed one end to the
bottom of the 'U' shape.
I then did what I can best describe as 'suitcase fastenings' that are on the top right-hand corner of the upper tunlc.
The tunic itself is like that of a biker's-kind of appropriate really! and has a large flap at the front, that fits double-breasted fashion, again I had no clear shots of these fastenings, the best that I could find was a portrait-style shot of Judge McGruder, in an issue of Cinefantastique. Again I did not want to make anything permanent, so I decided to make these fastenings in two halves-upper and lower, and have the upper slide onto the lower so that I could make repairs or alterations later on. I also decided to dispense with the actual flap design, seeing as the sweater fitted me quite snugly anyway, and as much as possible I would be wearing the armour, which obscured about half of it, but even without the armour, the upper tunic would still look good.
I cut 2 pieces 1 inch by 2
1/2, from 2mm sheet, and cut 2 slots in each, measuring 2mm by
10mm: ![]() and then cut 2 further pieces 18mm by 2 1/2 inches,
and cut one slot in each 2mm by 2omm. These I glued to the two
previous ones to form:
and then cut 2 further pieces 18mm by 2 1/2 inches,
and cut one slot in each 2mm by 2omm. These I glued to the two
previous ones to form: ![]() I then cut 2 further pieces 18mm by 2 1/2
inches cut a slot 2mm by 2mm in each and glued these to the
previous assemblies. For the upper assemblies, I cut 2 pieces 1
inch by 2 inches, and four strips-two, 5mm by 2 inches and two,
7mm by 2 inches, and glued these to form:
I then cut 2 further pieces 18mm by 2 1/2
inches cut a slot 2mm by 2mm in each and glued these to the
previous assemblies. For the upper assemblies, I cut 2 pieces 1
inch by 2 inches, and four strips-two, 5mm by 2 inches and two,
7mm by 2 inches, and glued these to form: ![]() I then made adjustments
so that the upper and lower assemblies would interlock, and so
that it could be prized apart easily, and I also glued 2 pieces
10mm by 7mm just above the 'T' shape of the lower assembly. These
would stop the upper assembly from going too far, and when both
assemblies were interlocked, finish off the basic design seen in
the photo. As a finishing touch, I sanded round all four edges
and scored on the surface design-again as seen in the photo, and
sewed them to the tunic.
I then made adjustments
so that the upper and lower assemblies would interlock, and so
that it could be prized apart easily, and I also glued 2 pieces
10mm by 7mm just above the 'T' shape of the lower assembly. These
would stop the upper assembly from going too far, and when both
assemblies were interlocked, finish off the basic design seen in
the photo. As a finishing touch, I sanded round all four edges
and scored on the surface design-again as seen in the photo, and
sewed them to the tunic.
I also decided at this point not to paint anything, just build everything and paint it afterwards. Then came the most ambitious thing that I have ever tackled-and next to the helmet the most recognisable-the armour! This took a hell of a lot of thought. Firstly, how was I going to attach the plastic sheets-I know what you are all thinking. All together now, 'Why did I not use Superglue!!'. The trouble with Superglue, strong though it is, is that it makes plastic brittle. Superglue is perfect for flat surfaces and structures, etc., which do not have to move, also the glued joint of any structure is its weakest point. If you've ever studied the Dredd armour, you will observe, apart from the obvious fact that it runs from just below the chest area, up over the shoulders and down to the base of the spine. If you have ever seen shots of the Judges from the side, you will note that the basic shape of the armour is that of a question mark.
Considering that most of the plastic sheets that would make up the armour would be bent to some degree, the least amount of glue that I use, the better. Added to this was the fact that the plastic would have to give-i.e. move a little, as I took it on and off, and general body movements etc. I then thought about using some sort of rivet. Ordinary rivets would be too strong, and the amount of hammering that I would have to do, and some need a rivet gun, I would no doubt damage the plastic. Then it came to me-popper studs! of the kind that you get on clothing, the larger heavy duty ones. I would not need to do much hammering-not much chance of damaging the plastic. I had a hunt through my wardrobe, and came across a pack of them that I had had for years.
On examination it turned out that the stud would only go through one level of 2mm sheet. I had originally had one idea of tying the whole structure together with green garden wire-a bit like some roof tiles are structured. I decided to take the basic idea and utilise it together with the pop fastener idea, but
only using the wire (each time using two lengths twisted together to form one). where the plastic sheet overlapped. I also needed something that the pop fasteners would use to hold the sheets together-a bit like a splint. At the factory where I work, we use dexion shelving-that large, grey-coloured, Meccano-like stuff. I had a hunt around and found half a dozen. They are triangular in shape, have a hole in each corner. and were ideal. For the underarm strap holders, another look around the factory produced four bulb reflectors from an aluminium reader (a device that look a bit like a television, and is used for reading microfiche). These have 2 holes punched in them already, and all I had to do was break off the smaller pieces to end up with an 'L' shape bracket, and then cut a 2 by 3/4 inch hole by drilling a hole first and then inserting a hacksaw blade, after which I filed and sanded all jagged edges smooth.
The main body of the armour was built as can be seen in the photos, and in three main sections-the two shoulder/breast sections and back spine section-the sheets that curve around my shoulders were held in their extreme bent positions by the garden wire, as can be seen in the photos. It was the only way that I could think of doing this. The wire also doubled as a holder for the foam padding that raised the armour to the correct height as seen in the movie. In the main I used the upper pop fasteners, only using the lower ones where the sections overlapped at the back, to make the gap as small as possible. I then drilled more holes and attached all three main sections-plus the 'bow tie' bit at the front, using the green garden wire method and ended up with what you see in the photos. The only places that I used Superglue were to fill in the gaps in between the sheets where they joined each other.
To maintain the idea to use as little glue on the main armour structure, I built the detail for the left shoulder separately-the 'gold bars' (well they look gold bar shaped to me!), and 2 flat plates, glued them as normal, then attached them to the armour main structure using wire, then added the top pieces afterwards. This is where I made a mistake. I forgot to add that crescent-shaped piece that fits directly on Dredd's shoulder (the lesser Judges, including Hershey, have this on both sides). I had a hunt around the kitchen and came across some old plastic Christmas pudding bowls. Two were white in colour and far too flimsy, the others were of a thicker red-coloured plastic, but shattered when I tried to cut them!
Rethink! I ended up taking
an A4 sheet of paper, cutting large notches out of it: ![]() and then taping the
notches shut to form a kind of canoe shape. Once I was satisfied
that the shape was right, I cut the tapes and flattened the paper
onto a sheet of plastic and drew around it Blue Peter style.
These were then cut out and I bent them as much as I could. After
a bit of trimming and bevelling, I managed to get the pieces to
fit together reasonably well. I wired up the ends-a bit like
staples, and applied tape to the middle whilst the glue dried. At
this point I carefully prized off the tops of the 'gold bars' and
lay them aside in order. I then tried to get it to fit. Could
I?-Could I hell! In the end I threw a wobbly-I threw it against a
wall which broke a piece off. I tried again - just out of
interest. It fitted (!) and I soon wired it into place.
and then taping the
notches shut to form a kind of canoe shape. Once I was satisfied
that the shape was right, I cut the tapes and flattened the paper
onto a sheet of plastic and drew around it Blue Peter style.
These were then cut out and I bent them as much as I could. After
a bit of trimming and bevelling, I managed to get the pieces to
fit together reasonably well. I wired up the ends-a bit like
staples, and applied tape to the middle whilst the glue dried. At
this point I carefully prized off the tops of the 'gold bars' and
lay them aside in order. I then tried to get it to fit. Could
I?-Could I hell! In the end I threw a wobbly-I threw it against a
wall which broke a piece off. I tried again - just out of
interest. It fitted (!) and I soon wired it into place.
I then tackled the detailing on the 'flat plates'. I found the best way to do this was by holding a sheet of paper over each of the plates, and pressing along the edges to form a crease, this was then cut out and the shape placed on a sheet of 1 mm thick plastic. I then drew round this and cut it out. The rest of the design was done by following the pictures in the 'Making Of' book. I then replaced the tops of the 'gold bars'. Once I had allowed the glue to dry, I did any necessary trimming.
As for the eagle design on the right shoulder, I literally thought about how to do it as I went along, which brought back memories of the warp engines on my U.S.S. Drone!. I started with the eagle's wings' 'leading edges'. If you study the design, you will notice that, compared to its body, the wings are in 'fully up' mode, with its back against Dredd's shoulder.
I started by drawing the
basic outline of the 'leading edge' on the armour. I then took a
sheet of paper and cut one side rounded inwards. This was trimmed
until the sheet fitted about flush against the armour. I then
drew another line about a 3/4 inch away from the curve side, and
then cut this out to end up with a ![]() shape. I placed this on
a sheet of plastic and carefully scored around it with a knife,
after which I cut it out. I then attached 'tabs' of plastic as
seen in the photo. After this I drilled holes and wired the strip
into place. For the two top pieces I followed as best as I could
the photos that I had, and fabricated these in the same way as
the long strip, all except for the tabs that had to be bent to
follow the curvature of the armour. I then built the back pieces
in the same way.
shape. I placed this on
a sheet of plastic and carefully scored around it with a knife,
after which I cut it out. I then attached 'tabs' of plastic as
seen in the photo. After this I drilled holes and wired the strip
into place. For the two top pieces I followed as best as I could
the photos that I had, and fabricated these in the same way as
the long strip, all except for the tabs that had to be bent to
follow the curvature of the armour. I then built the back pieces
in the same way.
For the flat piece that goes on top of the shoulder, and incorporates the eagle head, I cut a piece 65mm wide by 5 inches long, made one end rounded and bent the plastic length ways, again to fit the armour's curvature. This piece had to be cut in half before gluing to accommodate the length of garden wire that spanned the gap. On top of this I glued two further pieces that would eventually become the eagles head and neck. After this I twisted together two lengths of wire, bent them into a curved shape, and attached it to the armour as seen in the photo. This would act like a 'curtain rail' for some of the side feathers to be wired to.
Then came the feathers themselves. In some shots the longer ones look straight and solid, yet in others they bend in at least three places. Now, the designers and makers intended the armour to look protective - yet give the actor as much freedom of movement as possible, which leads me to think that more than one type of armour was built. This happens a lot in the T.V. and movie business of course, it's only when the scenes are cut together that it seems that the hardware can perform many different tasks. The feathers have been put on in a configuration that is like that of roof tiles. I began by cutting strips 2 inches wide and attaching the longer lower ones to the armour using wire, and then gluing the smaller upper ones to these. But as I did the second row up I encountered another problem - gravity. In the end I attached a loop of wire on the inside of the armour to hold these five feathers slightly outwards at an angle, to maintain the look of the movie. Again the way that the rest of the feathers turned out was almost exactly the same as Action Man Dredd!
I had another look at certain scenes in the film. I then noticed that the lower feathers appear to be somewhat telescopic! - god knows how I would do that! - so I decided not to bother. Also in these scenes where he raises his right arm directly outwards at right angles to his body, to use the Lawgiver, the armour raises noticeably, and when I tried my armour on and performed the same manoeuvre, it did the same - good enough for me! so I left it at that.
I then tackled the wing leading edges and the eagles head and neck. These are certainly not perfect but I did the best that I could. The beak was the most troublesome. I had to first of all glue the two sides to the head and let the glue dry, then glue the ends of the beak and hold them in position with a 'G'
clamp whilst the glue dried, after which I added the top and bottom areas, and after trimming where necessary, the armour was at last finished.
I then did two name plates,
I decided to do one for 'Dredd' and one for 'Info'. I cut 2
pieces this shape: ![]() to fit on the front of the armour. I made
an eagles head shape that would go on the upper section and stick
outwards (in the comic the head lays flat on its left side). I
then made a frame that went along the top and about an inch down
each side, after which I scored the areas of the design on. At
this point I put on the upper tunic and put the armour on, making
sure that I attached the chain - I had drilled a hole through the
top left-hand front plate, and inserted a piece of bent wire.
With all this on I looked in the mirror - I could almost see
Sylvester Stallone! I was getting there!
to fit on the front of the armour. I made
an eagles head shape that would go on the upper section and stick
outwards (in the comic the head lays flat on its left side). I
then made a frame that went along the top and about an inch down
each side, after which I scored the areas of the design on. At
this point I put on the upper tunic and put the armour on, making
sure that I attached the chain - I had drilled a hole through the
top left-hand front plate, and inserted a piece of bent wire.
With all this on I looked in the mirror - I could almost see
Sylvester Stallone! I was getting there!
I finally replaced the shoulder padding with larger pieces, so it was less of a balancing act and more comfortable.
Next time I will discuss the gauntlets, belt, holster and lawgiver and the rest.
Kevin 'Info' Goldsmith
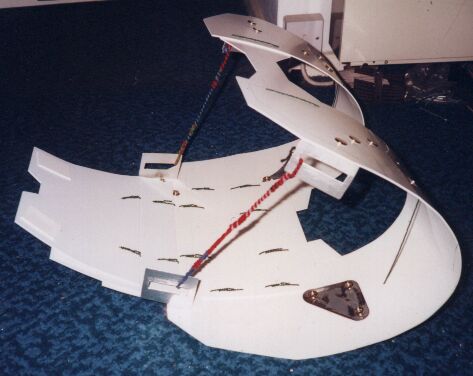
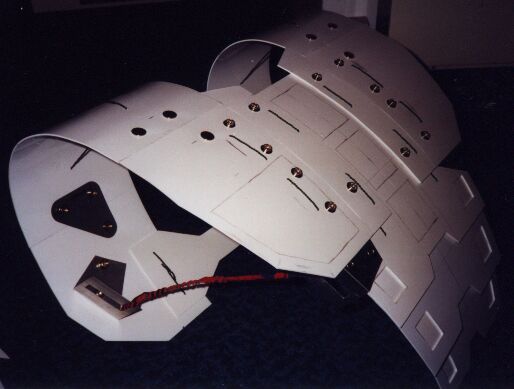
(3)-(4) Basic armour, made from 14 sheets of styrene, and four separate sections: front and rear and both sides. Pipecleaners are temporary underarm straps.

(5) Structures that will become the 'gold bars' and front and rear plates. They are shown here glued together. The white bits at top and bottom, and in the case of the structure at far right, the right and left bits, are so that the structures can be wired to the main armour.
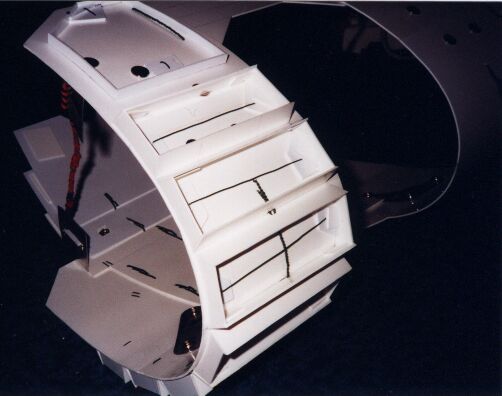
(6) Structures wired into place on main armour.
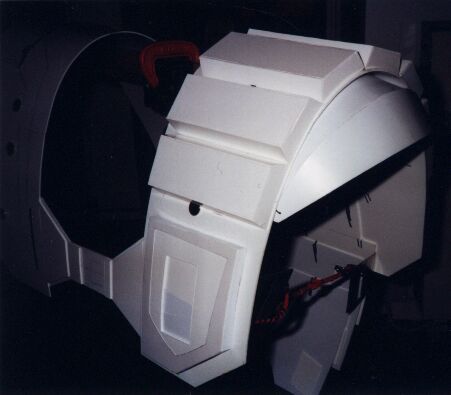
(7) Covers added to structures. Note also lower shoulder armour - 2 pieces glued together then wired to main armour.
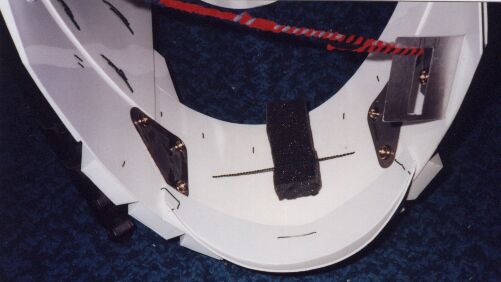
(8) How lower shoulder armour is wired to main armour in more detail. One of two foam pads to raise armour can also be seen.
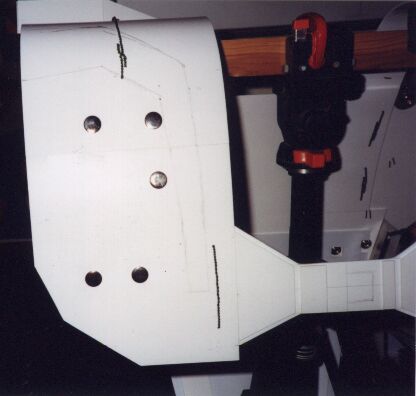
(9) Pencil outline for eagle wing leading edge to get dimensions as accurate as possible. Note: already built rear one can just be seen at top of picture.
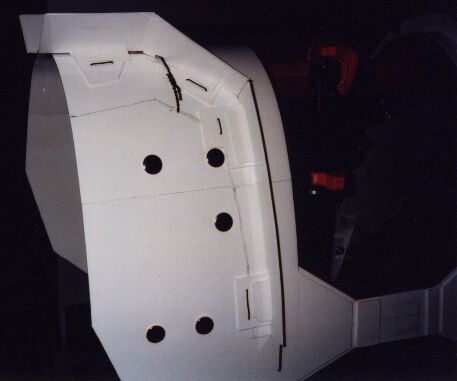
(10) Front wing leading edge built separately and then wired into place.
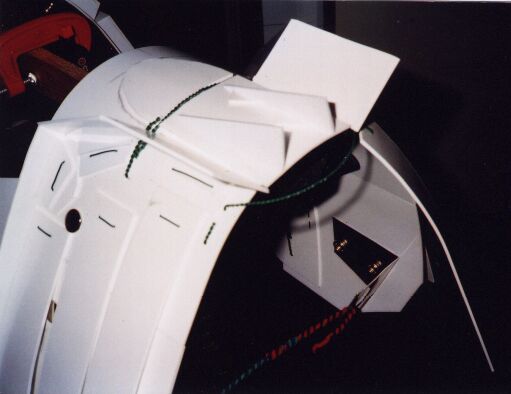
(11) Wire to hang first longer feathers around shoulder, can be seen dead centre. Also foundations for eagle beak and head can be seen on top of shoulder.
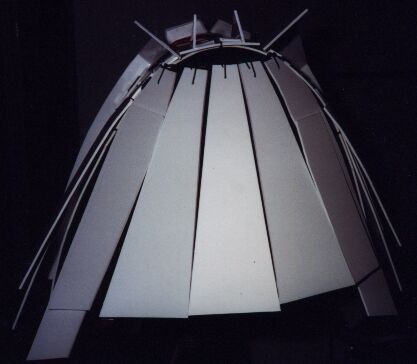
(12) All of first long feathers can be seen hanging in place.
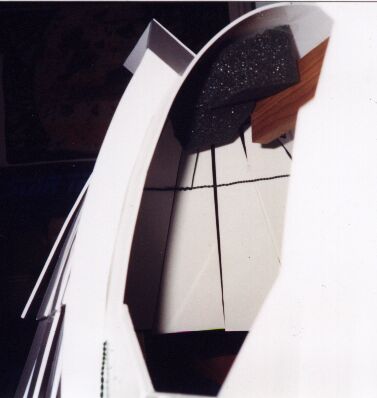
(13) Inside the left shoulder, showing the extra loop of wire that stops the feathers being affected by gravity. Single vertical wire at dead centre of picture prevents loop from being pushed downwards.
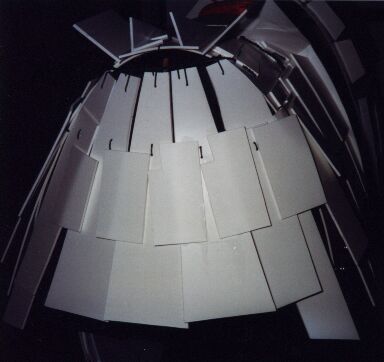
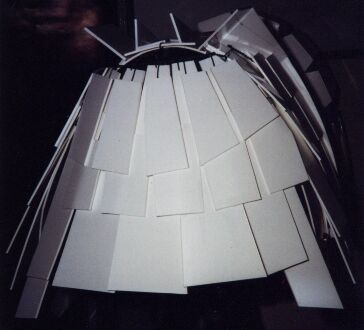
(14)-(15) the secondary and third layers of feathers are added. They were only glued where they touched, allowing for some movement.
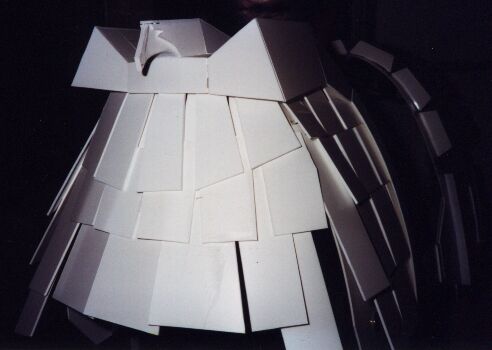
(16) Completed eagle shoulder structure.
