![]()
INTRODUCTION
![]()
IAN MARCHANT'S HELMET
![]()
HELMET
![]()
SHOULDER ARMOUR
![]()
GLOVES
![]()
ARM ARMOUR
![]()
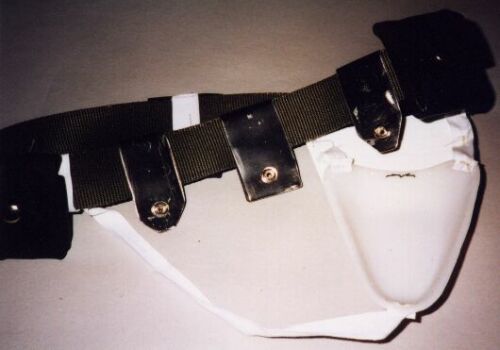
BELT AND CODPIECE
![]()
KNEE PADS
![]()
BOOTS
![]()
LAWGIVER AND HOLSTER
![]()
PAINTING
![]()
FINISHED
![]()
CONVENTION PHOTOS
HOW TO BUILD A JUDGE DREDD COSTUME
BY KEVIN GOLDSMITH
THE BELT AND CODPIECE
For the belt, I got some thick webbing that I had obtained from a surplus store in Oxford in the mid-80's (its original purpose I think was to make the criss-cross pattern seen on chairs before the cushioning is added). I held the webbing round my waist until it was snug, not too tight, then bent two 4 inch long loops before cutting off the length. I then twisted two 1-foot lengths of garden wire
Together, and bent this to
form a 1/2 inch by 2 inch square - this would form a buckle,
twisting the two ends together: ![]() I then looped one of
the 4 inch webbing ends around the buckle joint to cover it up
and sewed it to form:
I then looped one of
the 4 inch webbing ends around the buckle joint to cover it up
and sewed it to form: ![]() the other end I tapped in some popper
studs so that I ended up with this:
the other end I tapped in some popper
studs so that I ended up with this: ![]() For the eagle emblem I
cut a piece 7 cm by 15 cm. then drew the basic outline which I
carefully carved and cut away. I then added the surface detail by
either
For the eagle emblem I
cut a piece 7 cm by 15 cm. then drew the basic outline which I
carefully carved and cut away. I then added the surface detail by
either
Scoring (the feathers) or for the body and tail, cutting shapes and bevelling the edges. For the top and side borders, I used off cuts and strips glued on then filed and sanded. The eagles head was made the same way as the one on the main armour - see previous article. The stars were done in the same way as the upper then overlapped the first tunic collar studs. I finished by Supergluing the hooked strips of Velcro to the back of the eagle emblem and gluing then sewing the opposites to the belt loops.
For the pouches, I cut three strips from the remains of the gauntlet leather, measuring 9 1/2 inches by 6cm. This would form the front flap. The top, back, bottom and lower front, and then six further pieces to form the side pieces. I also allowed a 1/4 inch border for sewing. I then added elasticated loops to the backs of the pouches to make it easier to thread them onto the belt. Finally, I added popper studs to complete the look of the pouches.
For the crotch guard (jock strap) I removed the elastic and leather edging, and roughed up the guard's outer surface to give the paint something to stick to. I found a packet of white l inch wide webbing at the back of my cupboard. Again, all ends were smeared with Evo-stick to stop them from fraying. I sewed one end of the webbing to the top left corner of the guard. I then put the belt on and held the guard in place, and then using this and a photo in the 'Making Of' book judged (sorry!) the length and made a mark on the webbing with a pen just above the belt, and cut the webbing leaving an inch long tab which was folded back double, and sewed to the back of the left belt loop. I then sewed another length to the top right hand side of the guard, then cut and sewed the other end into a loop that would just slip over the popper studs on the right belt loop. I tried the assembly on - a nice snug fit. For the webbing that goes from the bottom of the guard, between the legs, and ends up at the rear of the belt, I sewed one into a loop for the back of the belt, put the assembly on, ran the webbing between my legs and, when everything was snug, pushed the webbing onto the bottom edge to crease it. I then made a pen mark on this, after which I again cut the webbing to leave an inch long tab that was sewed to the bottom of the guard. I tried the assembly on again. Yep, a nice snug fit.
For the three crotch armour
plates, I cut a piece of sheet plastic the same length as the
eagle emblem was wide and 6 inches wide. To get the two side
angles, I noted the angles that the two lengths of webbing came
from the emblem to the guard, and cut both sides of the first
piece. I noted from photos that the three plates overlap each
other about half and half, so I used the first plate as a
template for the second plate. I cut one side to the correct
angle, then overlapped the first over the second half way and
drew a line: ![]() and cut this away. I then repeated the same
procedure for the third, so that I ended up with three
overlapping plates. Once I had cut out the lower middle
'notches', cut out the six angled square holes, and backed them
with the remnants of the above procedure, I then attached the
plates to the crotch assembly. I did not want the structure to be
too solid, so I ended up drilling holes in the three plates and
sewing the upper one to the webbing where it protruded from just
under the belt, the middle one half way down the length of the
webbing, and the bottom one was wired directly onto the crotch
guard. This gave the plate assembly plenty of freedom of
movement, and when I tried the belt assembly on -everything
fitted just about right.
and cut this away. I then repeated the same
procedure for the third, so that I ended up with three
overlapping plates. Once I had cut out the lower middle
'notches', cut out the six angled square holes, and backed them
with the remnants of the above procedure, I then attached the
plates to the crotch assembly. I did not want the structure to be
too solid, so I ended up drilling holes in the three plates and
sewing the upper one to the webbing where it protruded from just
under the belt, the middle one half way down the length of the
webbing, and the bottom one was wired directly onto the crotch
guard. This gave the plate assembly plenty of freedom of
movement, and when I tried the belt assembly on -everything
fitted just about right.
Then I hit a bit of a snag. What to make the metal loops that attach the lawgiver holster to the belt out of. I rejected folded plastic, as pop fasteners cannot go through anything thicker than 3 mm. Same for bits of 1 1/2 mm thick leather, and would any paint stick to it - doubtful. Cloth smeared with Evo-Stick? Too messy. I then thought of the plastic milk bottles that you get in supermarkets. I ran tests. I roughed up one area with sandpaper, and sprayed this and another with car paint, but once dried the paint came off too easily and another thing - was the plastic strong enough to take the weight of the lawgiver and holster? I had misgivings. In the end I decided upon...well...metal. I had a search around at work and found some old machine covers, one made from 1 mm thick metal and the other slightly thicker. I hacksawed a 2 inch wide strip off the thicker cover and bent it double. The metal had cracks in it - nothing dramatic, but I felt that I could not use this thicker stuff. I had to go with the thinner metal, so I sawed, filed and sanded 3 pieces into shape. The two smaller pieces I cut the sides at an angle and filed the corners round. After cutting two further smaller pieces I bent the three main ones into two. Everything seemed O.K..no visible cracks. I then drilled holes in all the pieces, and once I had slipped the three longer ones onto the belt, I hammered in popper studs.
I then cut a length of webbing (the same stuff that I used to make the belt) 1 1/2 foot long and glued both ends, and at one end I placed a popper stud. I had a look through my mum's sewing box and found a small roll of 1 inch wide thin webbing. This I used to make the strap that makes the two straps that lead from the main one to the belt metal pieces. I rolled the two ends of this webbing twice and sewed the ends to the smaller metal piece, then the middle of this was sewn to the top of the main piece of webbing. I had not got enough of this 1 inch wide webbing to make the holster strap that goes round the upper middle of Dredd's leg, so I used the webbing that was left over from the crotch assembly. I sewed this to the bottom of the main webbing and then sewed lengths of Velcro to the ends of this.
I decided to leave the actual holster and lawgiver until last.
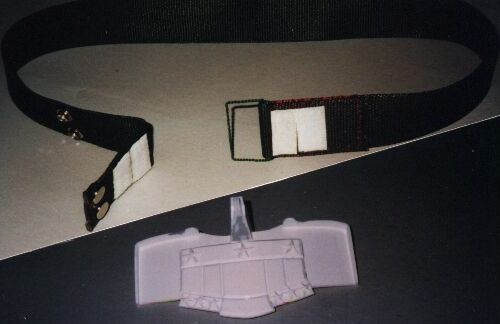
(1) Basic belt assembly, Velcro pieces to allow eagle emblem in foreground to be attached to front of belt.
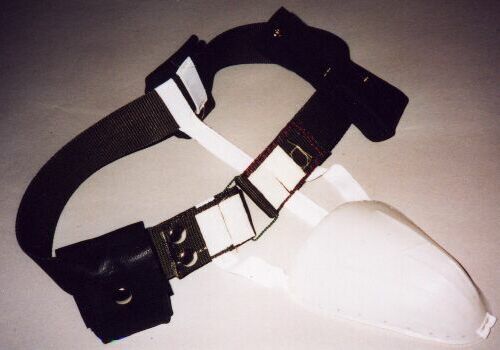
(2) Added pouches and basic jock-strap with straps has also been added.
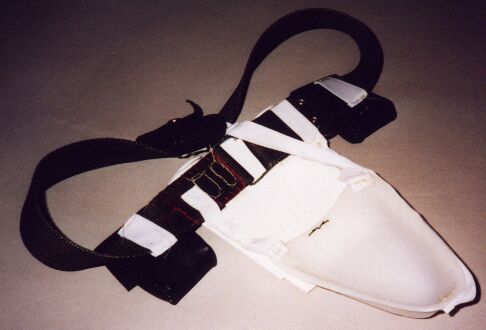
(3) Same assembly inside view.
(4) The three metal loops that the gun holster straps attach to.

(5) Gun holster straps.
![]() Judge Dredd and 2000 AD © Rebellion A/S 2008.
Judge Dredd and 2000 AD © Rebellion A/S 2008.
BARNEY is a fan site by
based on 2000 AD Online 2001-2008.