![]()
INTRODUCTION
![]()
IAN MARCHANT'S HELMET
![]()
HELMET
![]()
SHOULDER ARMOUR
![]()
GLOVES
![]()
ARM ARMOUR
![]()
BELT AND CODPIECE
![]()
KNEE PADS
![]()
BOOTS
![]()
LAWGIVER AND HOLSTER
![]()
PAINTING
![]()
FINISHED
![]()
CONVENTION PHOTOS
HOW TO BUILD A JUDGE DREDD COSTUME
BY KEVIN GOLDSMITH
GLOVES
First came the gloves. I tried using mine, and then my late father's driving gloves, both of which were as old as the hills, but after washing they just broke up, and a hunt around the house proved fruitless. An advert in the works canteen produced two pairs, but these were either to big or two thick, and an asking price of Ł15 and Ł20, but after a walk around town I eventually came across a motorbike shop where a chap found a pair that he did not know he had. These were a bit baggy but not to bad and he only charged me a tenner!
I then searched the town for some pieces of leather for the gauntlets. One person did leather goods 'in house' but would not let me have any off-cuts (tight git!), so I left the shop in disgust. Another one had a rummage through a couple of sacks that he had and produced two pieces that were the right size, that is they overlapped my arm at just below the elbow by two inches, and he only charged me Ł2.50. I went home a happy man.
I began by removing the Velcro tabs by undoing the stitching. They had been sewn on as separate items so came away cleanly.
I then placed all the relevant pictures of Dredd's costume that I had taken at Planet Hollywood up on a wall. The close-ups of his arms and hands told me of minor details that do not show up on publicity shots or the movie. The costume is also incomplete: the arm armour is missing, as is the lawgiver, holster and kneepads.
I started by cutting 8
pieces measuring 1/2 inch by 1 inch and sanding the ends round. I
then drilled 2 holes in each and sewed them to each of the
fingers just in front of the knuckles - I presume that these are
actually supposed to be 'knuckle dusters'. I then tackled the two
pieces that go on the backs of the hands. I cut 2 pieces this
shape: ![]() measuring 7 cm by 9 1/2 cm by 5 1/2 cm, and bent it
lengthways. If you are using E.M.A. sheets with a shiny side,
bend it so that the dull side is outwards or it will shatter. I
then added the wrist detail, and the detail that I can only
describe as 'jet aircraft engine intakes' - well that's what they
look like to me! After this was done, I drilled holes in them and
sewed them to the gloves.
measuring 7 cm by 9 1/2 cm by 5 1/2 cm, and bent it
lengthways. If you are using E.M.A. sheets with a shiny side,
bend it so that the dull side is outwards or it will shatter. I
then added the wrist detail, and the detail that I can only
describe as 'jet aircraft engine intakes' - well that's what they
look like to me! After this was done, I drilled holes in them and
sewed them to the gloves.
Then came the gauntlets. I
cut 2 pieces of leather that would overlap my arm by just over an
inch - I intended to use Velcro to make the gloves/gauntlets fit
snug to my arms. Both pieces were too long by 2 inches each way
so that I could trim later. I used sticky tape to hold the
leather together whilst I placed further tape along the border
where the Velcro would go: ![]() after which I laid
down the pieces of leather (now in a cone shape) flat on a
surface, and eased them into the gloves about 2 inches, and
placed tape on the leather up against the bottom of the glove:
after which I laid
down the pieces of leather (now in a cone shape) flat on a
surface, and eased them into the gloves about 2 inches, and
placed tape on the leather up against the bottom of the glove:![]()
I then sewed the leather pieces to the gloves.
Then the strips of Velcro. I had had these strips for years, and I cannot remember where I got them. I found that I could overlap the bottoms of the gloves by nearly an inch and a half to make them fit snugly to my wrists. I cut two 1 inch strips, and first of all glued them with Evo-stik (don't use Superglue, this will make the leather, and indeed any fabric go hard and brittle). I then sewed them in place, then using longer strips, did the same for the gauntlets, after this I trimmed the leather where necessary - the gauntlets should go no higher than the bend in the elbow.
I tried the gauntlets on. With the Velcro they had a nice snug fit - another part finished.
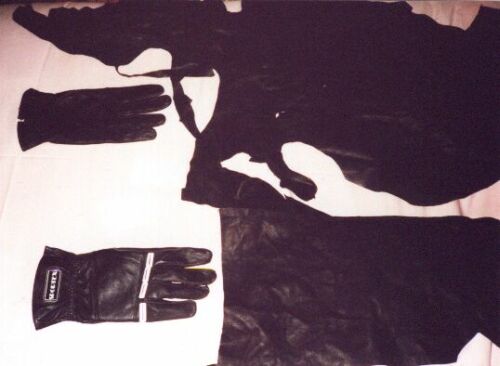
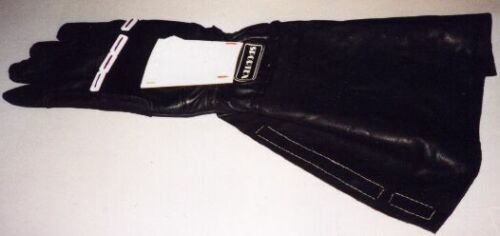
(1) Biker gloves, with 'knuckle dusters' already added, plus the 2 pieces of leather.
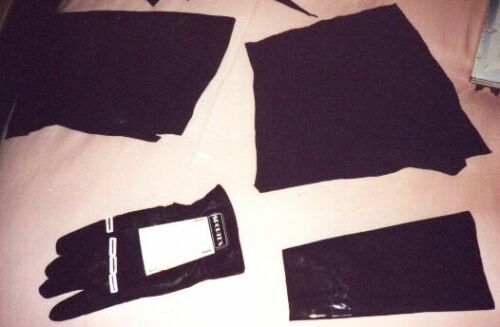
(2) Gloves with back of hand detail added and gauntlet section cut to shape. Tape to use as a guide when sewing can be seen in bottom left corner.
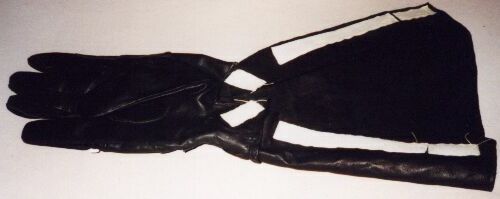
(3) Underside of completed gauntlet. White bits are strips of Velcro.
(4) Topside of completed gauntlet
![]() Judge Dredd and 2000 AD © Rebellion A/S 2008.
Judge Dredd and 2000 AD © Rebellion A/S 2008.
BARNEY is a fan site by
based on 2000 AD Online 2001-2008.